Starting with Version Control: Git, GitHub, How Commits Really Work, and First Commands
Introduction
This is my very first blog post.
I'm starting this space to document my learning journey as honestly and clearly as I can. I'm not pretending to be an expert, I'm just someone figuring things out, making mistakes, reading docs, watching tutorials, and slowly getting better at building stuff.
What is Git? What is GitHub?
Git
Git is a version control system — basically a time machine for your code.
It lets you:
Save exact snapshots of your project at any moment (called commits)
See exactly what changed between any two points in time
Go back to any previous version if something breaks
Experiment with new ideas safely (using branches) without touching your working code
Work completely offline — everything happens on your computer first
Git was created by Linus Torvalds in 2005 to manage the Linux kernel. Today it's the standard tool used by almost every developer and team in the world. When you install Git, you get a command-line tool that lives on your machine. The moment you run git init in a folder, that folder becomes a "repository" and Git starts quietly keeping track of everything inside it.
GitHub
GitHub is not Git.
GitHub is an online platform (owned by Microsoft) that takes your Git repositories and puts them in the cloud so you can:
Back up your work automatically
Share your code with other people
Collaborate with teammates (multiple people editing the same project)
Show off your projects to the world (great for portfolios)
Use powerful features like pull requests, code reviews, issue tracking, GitHub Actions (automation), and even free website hosting
You write and commit code using Git on your computer → you push those commits to GitHub → others can pull your code, make changes, and suggest improvements back to you.
What Exactly is a Repository?
A repository (repo) is a project folder + its complete version history.
Technically, when you run git init, Git creates a .git directory that contains:
all committed snapshots (in compressed form inside
objects/)references to branches and tags (
refs/)configuration and index files
Every commit is a full snapshot of the project at that moment (though Git stores only the differences efficiently using delta compression and pack files).
Local repo — on your computer
Remote repo — usually on GitHub
The Three Core Areas of Git
Git manages your project in three distinct states:
Working Directory
Your actual files — what you see and edit.
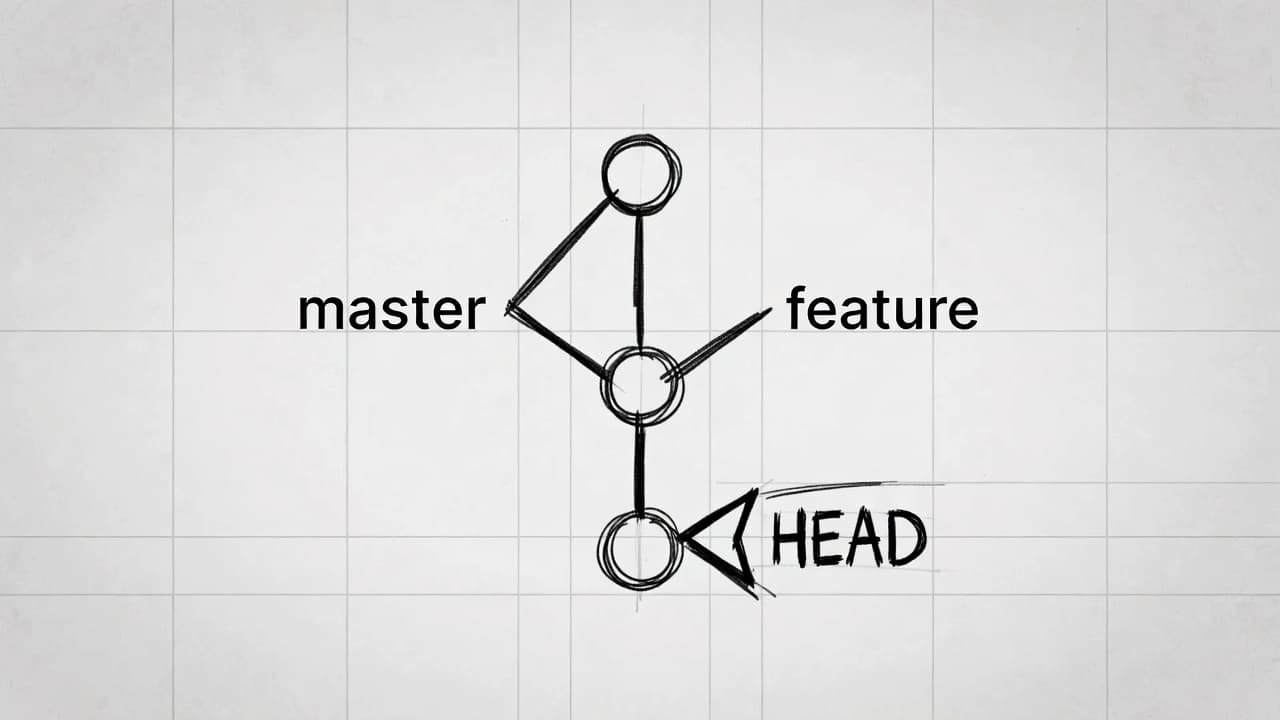
Git compares them against the last commit (HEAD) to detect modifications.Staging Area (also called the index)
A middle layer stored in.git/index.
When you rungit add, Git copies the current version of those files into the index.
This lets you commit exactly what you staged — even if other files are still changed or untracked.Repository (committed history)
Permanent snapshots created bygit commit.
Each commit is identified by a 40-character SHA-1 hash (e.g.,a1b2c3d...).
Commits point to a tree object (directory structure), parent commit(s), author, date, and message.
Visual summary of the flow:

Basic Git Commands — The Ones You’ll Use Every Day
1. git init
What it does: Turns a normal folder into a Git repository (repo). It creates a hidden .git folder that stores all the version history, branches, configuration, etc.
When to use it: The very first time you want Git to start tracking a project.
After this, Git is "watching" the folder. Nothing is tracked yet, you still need to add and commit files.
Tip: You only run git init once per project (unless you're starting fresh).
2. git status
What it does: Shows you the current state of your repo. It tells you:
Which files are modified but not staged
Which files are staged (ready to commit)
Which files are new (untracked)
Which branch you're on
When to use it: Literally all the time, before and after almost every command. It's your safety check.
Tip: Run git status first whenever you're unsure what's going on.
3. git add
What it does: Moves changes from your working directory to the staging area (also called the index). Staging lets you choose exactly what you want to include in the next commit.
When to use it: After you've made changes and you're ready to prepare them for committing.
Common ways to use it:
git add file.txt              # stage one specific file
git add css/style.css         # stage another
git add .                     # stage ALL changes (new + modified + deleted)
git add docs/                 # stage everything in the docs folder
Important: git add doesn't save anything permanently — it just prepares the snapshot.
4. git diff
What it does: Shows the actual line-by-line differences (deltas) between versions of your files.
Common uses:
git diff→ unstaged changes (working directory vs staging area)git diff --staged(orgit diff --cached) → staged changes (staging area vs last commit)git diff HEAD→ all changes since last commit (staged + unstaged)
Output might look like:
- Old line that was removed
+ New improved line added here
Tip: Use git diff before git add to double-check what you're about to stage.
5. git commit
What it does: Takes everything in the staging area and saves it as a permanent snapshot (a commit) in your repo's history. Each commit gets:
A unique ID (SHA hash)
Your message
Author info
Timestamp
Pointer to parent commit(s)
When to use it: After staging — this is when you actually "save" your progress.
Basic usage:
git commit -m "Add user login form and validation"
(The -m lets you write a short message inline.)
Good commit message tip: First line = short summary (50 chars or less), then blank line, then details if needed.
6. git log
What it does: Shows the commit history — who changed what, when, and why.
Useful variations:
git log                       # full detailed history
git log --oneline             # compact: one commit per line (most useful!)
git log --oneline --graph     # shows branch merges visually
git log -p                    # shows the diff (changes) for each commit
git log --author="Tushar"     # filter by author
git log -3                    # show only last 3 commits
Thanks for reading my very first post. Here's to many more commits, many more lessons, and way fewer "final_v99" files.